
You wake up the morning after injectables and notice a bruise that wasn't there when you left the clinic. It may sit beside the eye, along the lip, or over the cheek, and suddenly a normal workday or planned photograph feels difficult. The safest way to conceal a bruise on your face isn't to cover it as quickly or as heavily as possible. First, decide whether the skin is ready for cosmetics, then match the correction to the bruise's current color, and build coverage without rubbing or disturbing tender tissue.
Table of Contents
- What to Expect Before You Reach for Makeup
- Understanding Bruise Color Stages and Skin Safety
- Choosing the Right Color Corrector for Your Bruise
- Layering Concealer and Foundation Without Shifting Coverage
- Adapting Coverage for Lighting and Photography
- Common Mistakes and When to Skip Makeup Entirely
- Professional Options for Reducing Bruising at ProMD Health
What to Expect Before You Reach for Makeup
A bruise is trapped blood beneath the skin, and makeup can hide its visible color, but it can't remove the underlying discoloration immediately. A 2021 clinical review of bruise treatments found that makeup, cosmetic powders, and concealers are practical masking options, while available methods don't directly correct the hemoglobin breakdown responsible for the changing color. The same review found insufficient clinical data to support the safety or effectiveness of marketed bruise-bleaching products.
That distinction matters the morning after a facial procedure. Camouflage is a cosmetic strategy, not a treatment. Facial bruises commonly change and fade over approximately 10 to 14 days, so the product you use today may not be the product you need later. A fresh bruise may require stronger neutralization, while a fading yellow or brown area may look worse under a dense layer.
Before applying anything, wash your hands and inspect the skin in good light. If the area is dry but intact, a small amount of bland moisturizer may help prevent cracking. If there is an open puncture, oozing, broken skin, a fresh incision, marked warmth, or significant swelling, leave makeup off that area and follow the instructions from your treating clinician. You can review general preparation principles in this guide to prepare for a facial, but procedure-specific instructions should always take priority.
Practical rule: If makeup application requires rubbing, pressure, or repeated correction to look even, the skin may not be ready for cosmetic coverage.
Don't massage a bruised or recently injected area to force the color to fade. Don't apply an untested bleaching product because the discoloration is inconvenient. Give the tissue time to settle, and use makeup only when the surface is closed, comfortable, and suitable for gentle contact.
Understanding Bruise Color Stages and Skin Safety
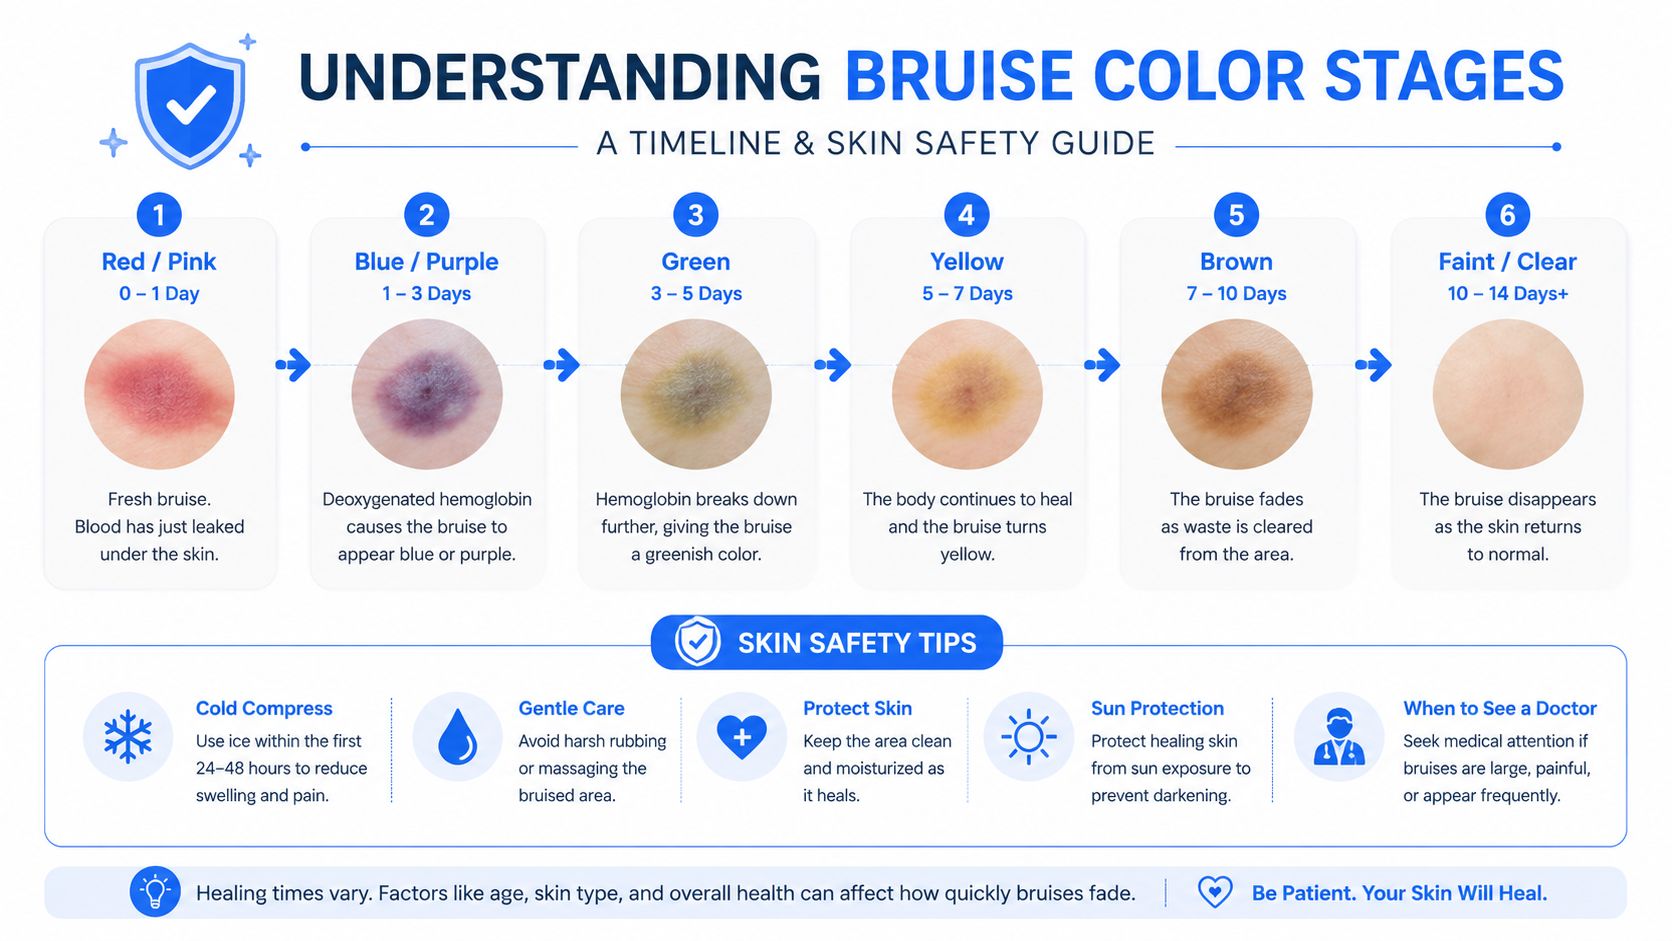
If you wake up the morning after injectables with a visible mark, the color helps determine both your coverage plan and whether the skin is ready for contact. Facial bruises often begin reddish, become dark blue or purple within 1 to 2 days, shift toward green or yellow around days 5 to 10, then appear yellow-brown or light brown by approximately days 10 to 14. This progression is described in a medical review of post-procedure bruising.
The same review notes that bruising after nonsurgical cosmetic procedures can resolve spontaneously within 10 to 14 days, and that camouflage makeup may be appropriate when the discoloration is unacceptable. MedlinePlus describes a broader sequence from pinkish-red to dark blue or purple, violet, green, dark yellow, and pale yellow. Healing does not follow an identical timetable for every person, so reassess the dominant color instead of using one concealer shade throughout.
Check the skin before applying anything
A bruise over intact skin can tolerate gentle contact differently from discoloration beside a healing wound. Use this assessment:
- Closed and comfortable: Gentle makeup may be reasonable if your clinician has not provided different instructions.
- Dry or flaky: Apply only a thin moisturizer, let it absorb, and do not scrub away flakes.
- Fresh injection sites: Keep cosmetics off pinpoint openings until they close and your provider confirms application is appropriate.
- Incisions or broken skin: Keep makeup away from the wound and its immediate edge.
- Increasing swelling or warmth: Stop cosmetic coverage and contact your treating practice for guidance.
The practical question is whether the skin barrier can tolerate cleansing, tapping, layering, and removal without added irritation. If the area feels hot, increasingly painful, or unusually tense, makeup should wait while you seek medical advice. A bruise can be visible and still be suitable for careful coverage, but open or worsening skin requires a different response.
Choosing the Right Color Corrector for Your Bruise
Color correction works because complementary colors visually neutralize each other. Skin-tone concealer alone may reduce contrast, but it often can't cancel a strong red, blue, purple, green, or yellow cast. Apply the smallest amount of corrector that reduces the dominant color, then cover it with a concealer that matches the surrounding skin.
| Bruise Color | Corrector Shade | Best For |
|---|---|---|
| Red or pink | Green | Muting fresh red-toned discoloration |
| Blue or purple | Yellow or peach | Softening deeper cool tones |
| Yellow-green | Light yellow or peach | Balancing later mixed-color stages |
| Yellow-brown or brownish | Peach or orange | Neutralizing warm, muted discoloration |
These are starting points, not rigid rules. A bruise may contain several colors at once, especially around the edges, so you might use green on one small red section and peach on a neighboring yellow-brown section. A single thick layer of orange across the entire area can make the final result look muddy.
Adjust for your undertone
Deeper skin tones often need a corrector with enough warmth and depth to neutralize discoloration without leaving a pale gray film. If a corrector looks chalky before foundation, it's probably too light, too cool, or both. Choose a shade that counteracts the bruise while remaining closer to your natural depth, then use a skin-matching concealer over it.
For help separating correction from your final complexion match, this concealer shade matching guide offers useful context. The practical test is simple. Apply a tiny amount, press your complexion product over it, and check whether the area looks neutral in daylight. If it turns gray, reduce the amount or choose a warmer, deeper corrector.
Color correction should disappear under the concealer. If you can clearly see green, yellow, peach, or orange after the complexion layer, too much product has been applied.
Reassess the shade as the bruise changes. The corrector that worked on purple discoloration may be unnecessary once the bruise becomes yellow-brown.
Layering Concealer and Foundation Without Shifting Coverage
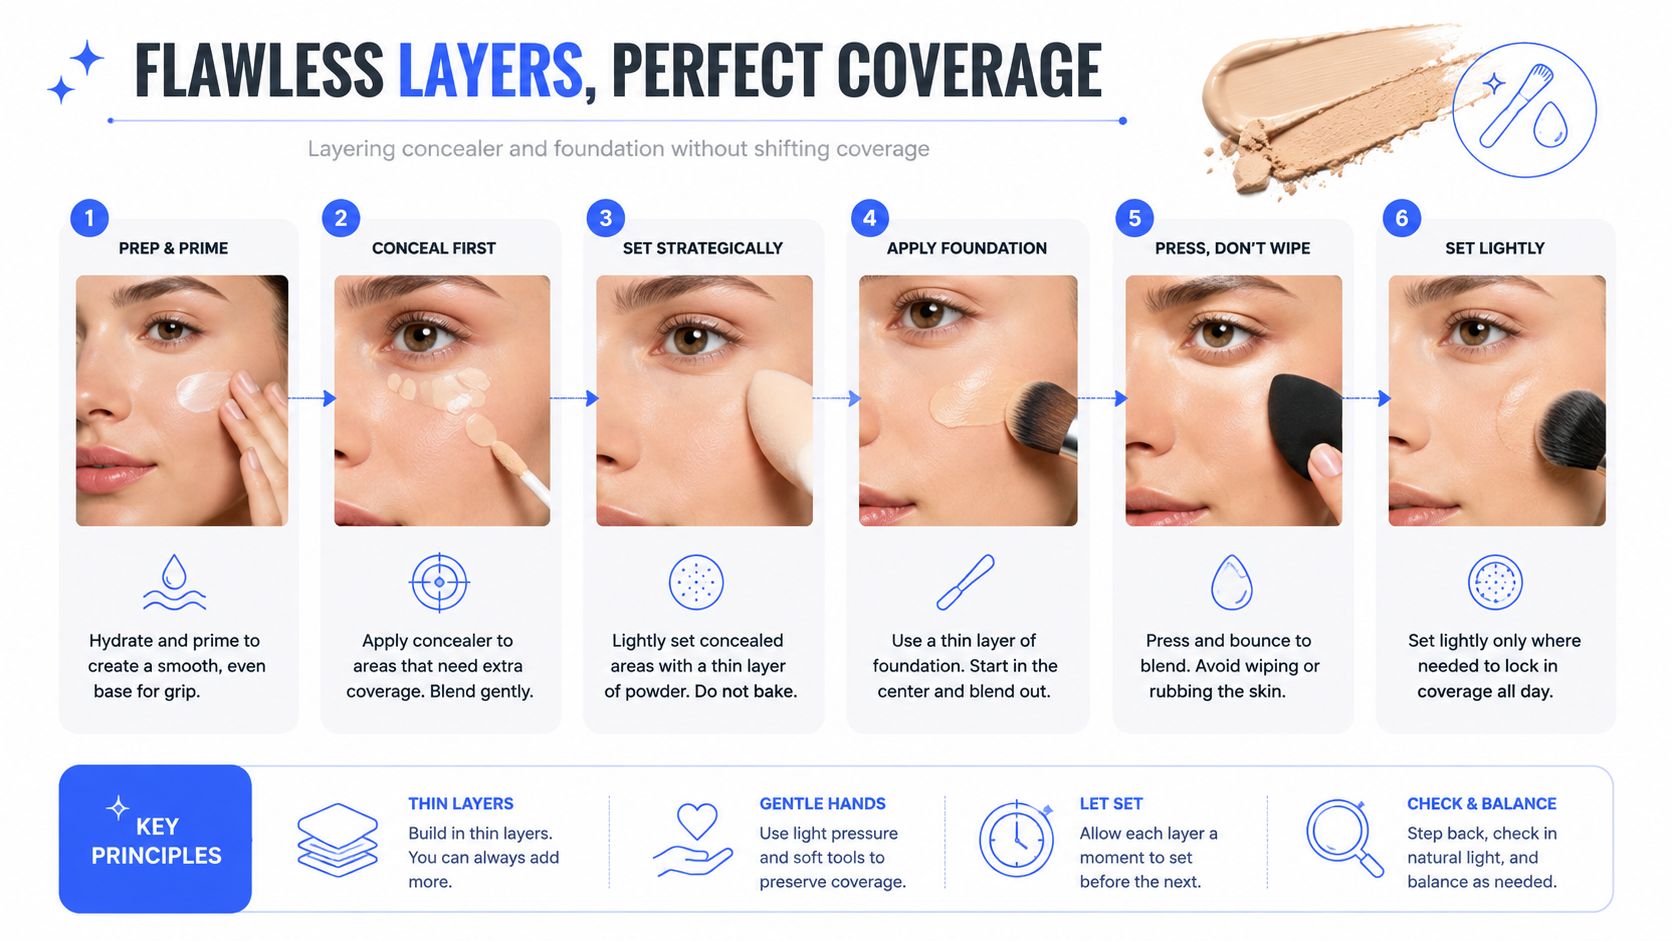
Makeup should follow the condition of the skin, not the urgency of the event. On intact, comfortable skin, use thin, pressed layers. If the area is tender, hot, swollen, open, or recently treated, pause rather than forcing full coverage. Light pressure helps avoid disturbing sensitive tissue and keeps the bruise from looking more textured.
For practical technique, this technical makeup guidance for covering a bruise also emphasizes minimal pressure and thin application.
Build the base carefully
- Prepare only if needed. On intact, dry skin, apply a thin layer of moisturizer and allow it to settle for about 10 minutes. Skip moisturizer on oily skin or any area that is freshly treated, irritated, broken, or unusually sensitive.
- Place the corrector precisely. Tap it onto the visible discoloration with a clean fingertip or small sponge. Keep the product within the bruised area instead of spreading it widely.
- Pause and inspect. Give the layer a moment to settle. If the bruise still shows, add a small amount. Several light applications are easier to control than one heavy coat.
- Press on concealer. Use a concealer that matches the surrounding complexion. Pat it over the corrector without rubbing, since friction can move the neutralizing layer and uncover the original color.
- Press foundation around and over the area. Tap the foundation so it joins the surrounding skin. Dragging a brush or sponge across the bruise can lift the layers underneath.
- Set selectively. Press a small amount of translucent powder onto the covered area. Too much powder can emphasize dryness, so set only where movement or creasing is a problem.
Why coverage fails
Coverage usually breaks down when the corrector is too thick, the foundation is blended into it, or the area is left unset. The result can look patchy, muddy, or visibly raised, especially as the bruise changes through its roughly 10 to 14 days of healing.
Reassess the base as the color shifts. A formula or amount that worked over purple discoloration may look excessive once the bruise becomes yellow-brown. Use a clean tool and a light hand, particularly near the eye. If the surface is painful, stop layering. Reducing the color while preserving natural texture is safer and often more convincing than a thick patch.
Adapting Coverage for Lighting and Photography
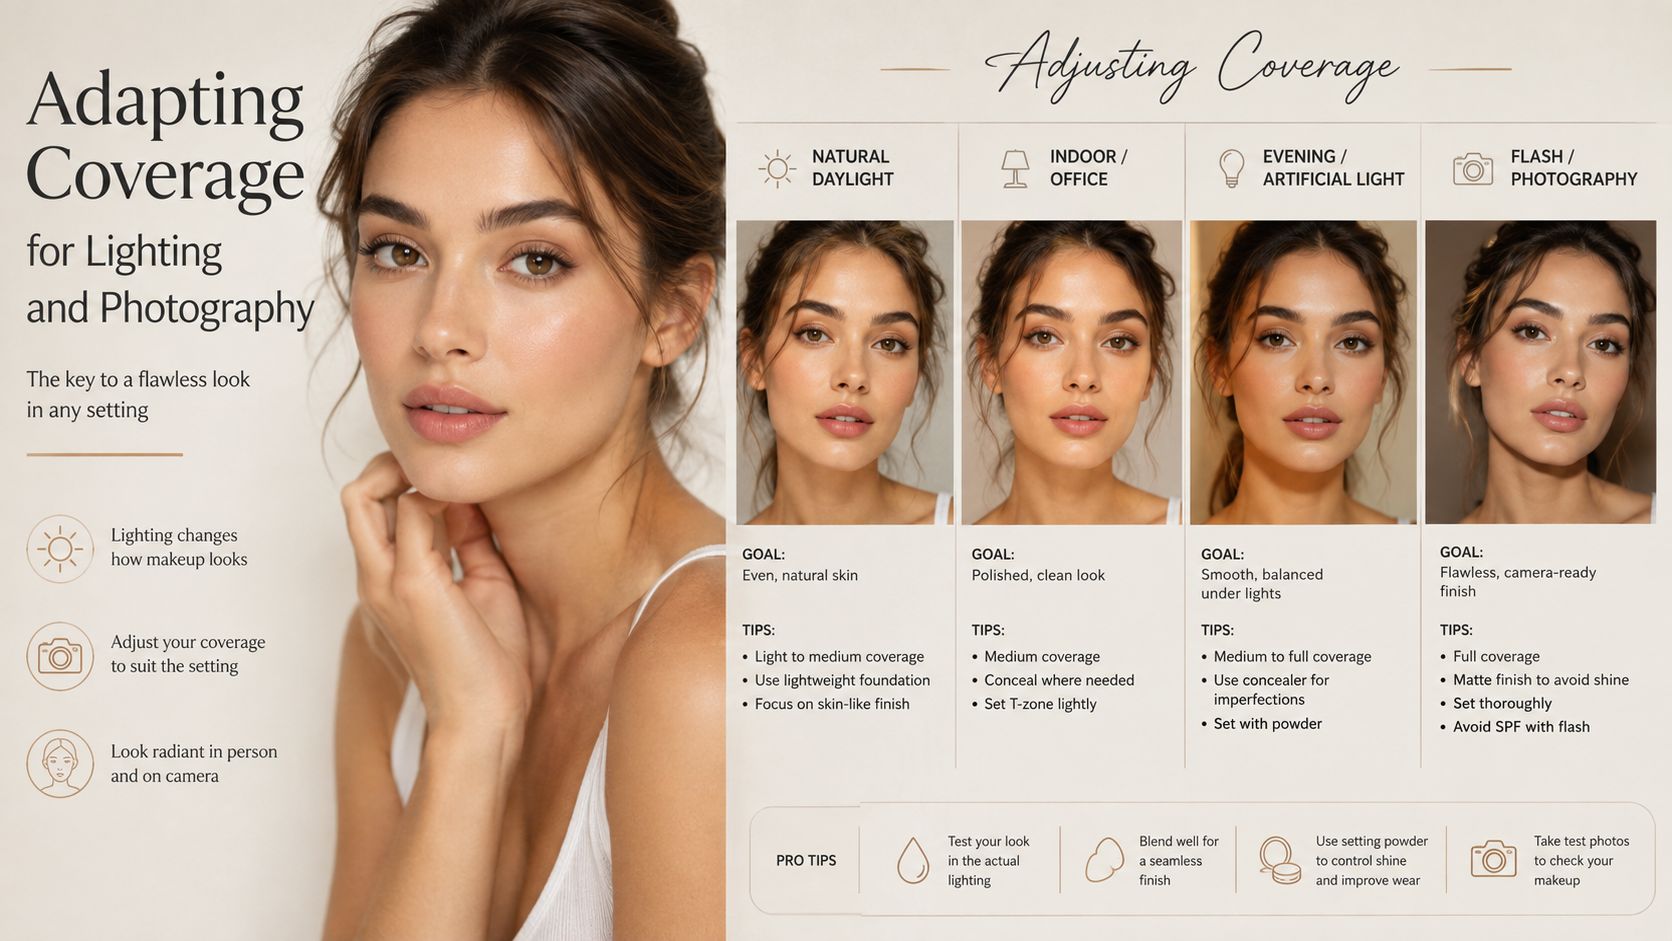
A face that looks concealed in a dim bathroom may reveal the bruise in a bright office, direct sunlight, or a phone camera. Check the finished makeup in more than one setting before leaving home. Natural daylight shows whether the corrector has left a green, orange, gray, or ashy cast, while indoor lighting can disguise a mismatch.
Make the finish look like skin
Thin, pressed layers generally photograph more naturally than one thick coat. Heavy product can catch light on raised or dry texture, making the covered area more noticeable even when the color is hidden. For flash photography, inspect the result with the camera you expect to use, because reflective powders or SPF-heavy complexion formulas may create a pale cast.
Keep a small touch-up kit with:
- The corrector: Choose the shade that matches the bruise's current dominant tone.
- A matching concealer: Use it to restore the surrounding skin color.
- A small sponge or fingertip-clean tool: Press rather than wipe.
- A little translucent powder: Set only the area that needs reinforcement.
Don't remove the entire base for a small midday change. Blot gently if needed, then press a small amount of corrector and concealer over the visible spot. As the bruise evolves, the right touch-up may be lighter and warmer than the original application.
Common Mistakes and When to Skip Makeup Entirely
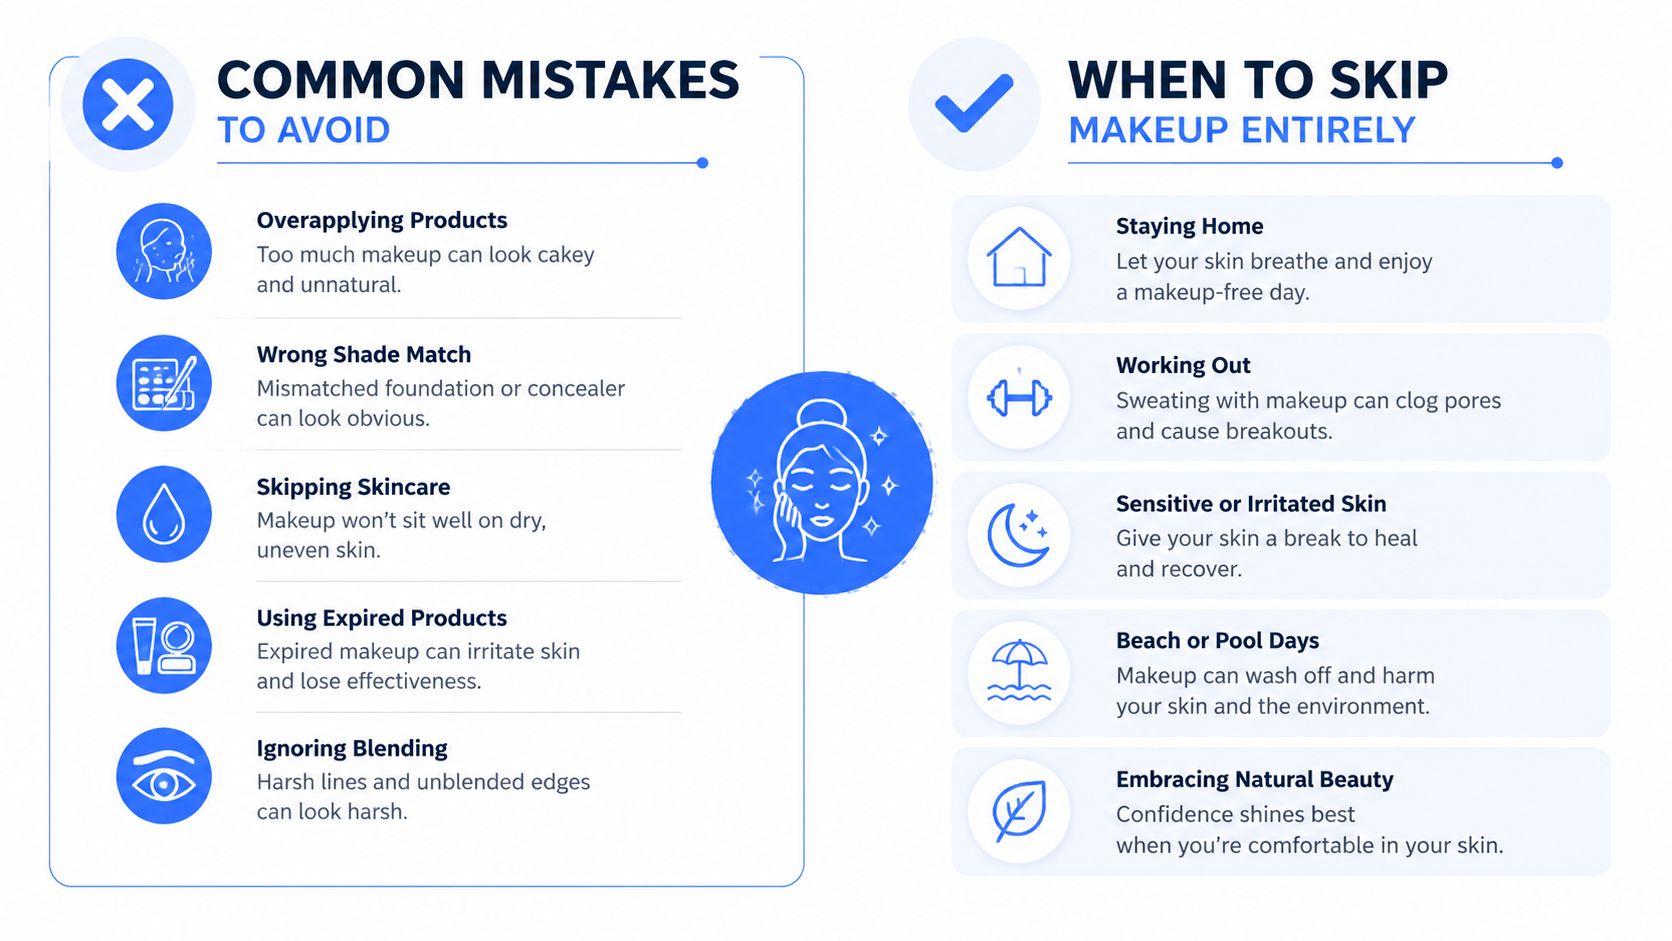
Makeup isn't automatically harmless because it's labeled cosmetic. A fresh injection site, incision, or irritated surface needs protection, and vigorous application can add friction to tissue that's already swollen or sensitive. If your provider gave you a specific waiting period or cleansing routine, follow that plan over general makeup advice. The post-treatment care instructions can help you organize questions before applying products after a procedure.
Stop and seek guidance when the pattern changes
Skip makeup over:
- Open skin or incisions: Cosmetics can interfere with wound care and complicate inspection.
- Fresh, unclosed injection points: Wait until the skin has closed and your clinician confirms that gentle application is acceptable.
- Marked swelling, warmth, or tenderness: These symptoms deserve assessment, not camouflage.
- Rapidly spreading discoloration: Contact the treating practice promptly.
- Vision changes or severe symptoms: Seek urgent medical advice rather than covering the area.
- A bruise that isn't improving within the expected window: Arrange a clinical review.
For routine application, avoid scrubbing, rubbing foundation into the corrector, and using a corrector so opaque that it changes the surrounding skin color. Most bruises heal without treatment in roughly 2 weeks, although some last 2 to 4 weeks or longer depending on severity and location, according to Alberta Health Services guidance. Persistent or worsening changes need a clinician's assessment.
Professional Options for Reducing Bruising at ProMD Health
If bruising is a recurring concern, professional planning can be more useful than trying increasingly strong makeup. A licensed provider can review your skin, discuss treatment timing, explain preparation and aftercare, and tell you when follow-up is appropriate. ProMD Health offers non-surgical aesthetic services including neurotoxins, dermal fillers, lasers, skincare treatments, and regenerative options, with availability verified by location.
A thoughtful complexion routine can also support comfortable day-to-day skincare between appointments. This resource on how to build a better complexion routine may help you think through gentle product layering, but it shouldn't replace individualized post-procedure instructions. For selected facial regenerative goals, ask whether PRP treatment for the face is appropriate for you.
ProMD Health provides consultations and non-surgical aesthetic care designed around your treatment goals, skin condition, and recovery needs. Visit ProMD Health to connect with a licensed provider at an approved location and discuss safe bruise prevention, aftercare, and camouflage timing before your next facial procedure.


