
You've just left your filler appointment, and the numbing cream is beginning to fade. Your face feels less “frozen,” more puffy, with a low warm throb around the injection points. You catch your reflection in the car window and notice slight asymmetry. The question is immediate and practical: what should you do now?
The first week after dermal fillers is usually manageable, but it isn't completely hands-off. Mild swelling, pinpoint tenderness, redness, bruising, and temporary unevenness can all occur before the treated area settles. In a large multicenter randomized study, local injection-site reactions occurred in 90.6% of collagen patients and 93.5% of hyaluronic-acid patients, and those reactions lasted less than seven days, as reported in the clinical study on filler recovery reactions. The right aftercare approach helps you stay comfortable while making it easier to recognize when a symptom needs professional attention.
Table of Contents
- What the First Hour After Fillers Really Feels Like
- Your First 24 Hours of Dermal Fillers Aftercare
- Days 2 Through 7 and How Healing Progresses
- The Do's and Don'ts That Shape Your Result
- Common Side Effects and the Red Flags That Need a Call
- Weeks 2 to 4, Skincare, and Planning Your Follow-Up
- Your Quick Recovery Checklist and Next Steps
What the First Hour After Fillers Really Feels Like
The first hour often feels more dramatic than it looks. Numbing cream may still dull sensation while swelling develops, so a patient can feel “frozen and puffy” at the clinic, then notice warmth, pressure, or a mild throb while walking to the car. That change doesn't automatically mean something is wrong. It reflects the transition from treatment to early recovery.
A little swelling at the injection points is expected. The treated area may also look slightly uneven, especially with lip filler, because swelling rarely develops perfectly symmetrically. Try not to judge the result in a car mirror, under harsh bathroom lighting, or from a series of close-up photographs. Early swelling can exaggerate volume and obscure the shape you'll see later.
Your first decisions matter
I tell patients to keep the first hour deliberately boring. Leave with clean skin, avoid applying makeup over fresh injection points, and keep your hands away from the treated area unless your provider has specifically asked you to massage it. Avoid heat, alcohol, and unnecessary errands that leave you flushed or overheated.
A cool compress can be useful, but it should be wrapped and applied gently rather than pressed into the skin. Don't place ice directly on the treatment area. The aim is to calm discomfort without adding cold injury or mechanical pressure.
Practical rule: If you're worried by a small amount of swelling or asymmetry, take one calm baseline photograph and wait before making another judgment.
The first hour is also the right time to save your clinic's contact details and review the instructions you were given. Pay attention to symptoms that are escalating rather than just present. Normal recovery can look imperfect at first, but it should generally move toward less discomfort and less swelling as time passes.
Your First 24 Hours of Dermal Fillers Aftercare
When you get home, keep the routine simple and time-based. Your skin has been punctured, so cleanliness and minimal handling matter more than an elaborate skincare routine.
When you arrive home
- Keep your face clean and makeup-free. Don't cover fresh injection points with foundation, concealer, or heavy skincare.
- Use a cool compress gently. Apply it for about 10 to 15 minutes at a time, then remove it and allow the skin to rest, following the post-filler cooling guidance. Never press hard or place ice directly against the skin.
- Drink water and choose simple food. If your lips were treated, soft foods may be more comfortable. A lower-sodium meal can help you avoid adding to the sensation of puffiness.
- Use only the pain relief your provider considers appropriate. Paracetamol may be suggested for mild discomfort. Don't take aspirin or ibuprofen unless your clinician has cleared them for you, because they may increase bruising for some patients.
Most patients can resume ordinary activities right away, but professional guidance recommends avoiding intense physical activity for 24 to 48 hours to limit swelling and bruising. Heat can have a similar effect, so skip strenuous exercise, saunas, hot tubs, and very hot showers during the early recovery period.
Your first night
Sleep on your back if you can, with your head gently raised. Avoid burying your face in a pillow, leaning pressure onto a treated cheek, or sleeping with your hand under your chin. Use a clean pillowcase, and don't massage or press the treated area unless your injector has given you a specific massage protocol.
At around hour six, take one well-lit baseline photograph from a comfortable distance. Don't use it to grade the result. It gives you and your provider a useful comparison if swelling changes or a question develops later.
For lip-specific expectations, keep the lip filler day-by-day recovery guide available alongside your personalized instructions.
Days 2 Through 7 and How Healing Progresses
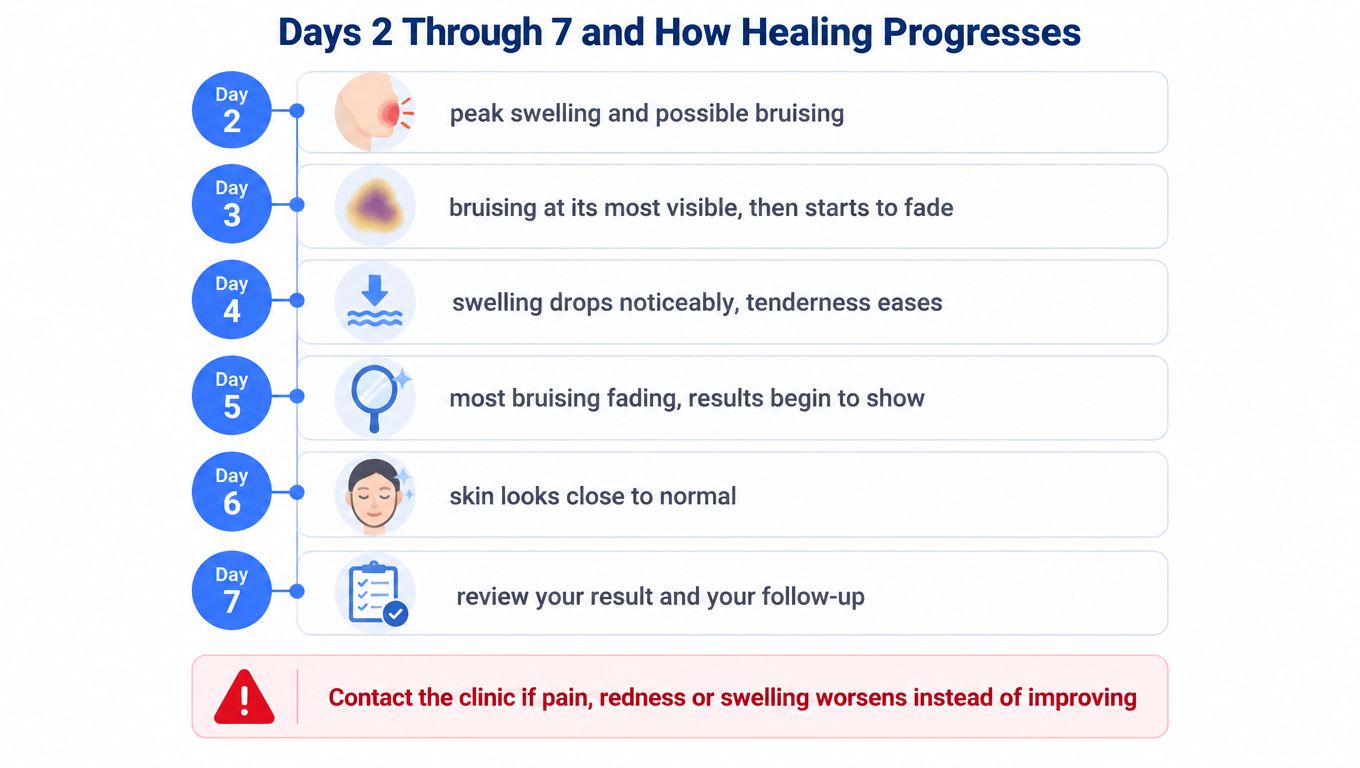
The second day can be psychologically difficult because swelling or bruising may look more noticeable before it improves. That doesn't mean the filler has moved or that the treatment has failed. A bruise can deepen in color as it becomes easier to see, while mild tenderness remains around the injection sites.
A practical day-by-day view
Day 2: Expect possible peak swelling, visible bruising, and mild tenderness. Continue to avoid pressing, kneading, or repeatedly checking the treated area. If the area is becoming increasingly painful rather than just tender, contact the clinic.
Days 3 and 4: Swelling should begin to settle for many patients. Bruises may change from purple to green or yellow as they fade. Gentle cleansing is appropriate, but use lukewarm water and avoid scrubbing.
Day 5: The treated area often looks more familiar. Makeup may usually be resumed once the injection points are closed and the skin isn't irritated, but your provider's advice takes priority. Don't use coverage to conceal a symptom that is worsening underneath.
Days 6 and 7: The early contour becomes easier to assess as the product settles into the surrounding tissue. The dermal filler results guide can help you understand why early appearance isn't always the finished result.
Light exercise can usually be reintroduced around day 2 or day 3, provided swelling and discomfort are improving. Delay facial massage and dental work according to your provider's advice, particularly after treatment around the lips or lower face. Avoid retinoids, acids, exfoliants, and other strong actives directly over recently treated skin until it feels calm.
Ask yourself three questions each day: How does it look? How does it feel? Is anything getting worse instead of better?
The third question carries the most weight. A bruise can look unpleasant and still be routine. Progressive pain, spreading redness, increasing warmth, or a new change in skin color deserves a call rather than more observation.
The Do's and Don'ts That Shape Your Result
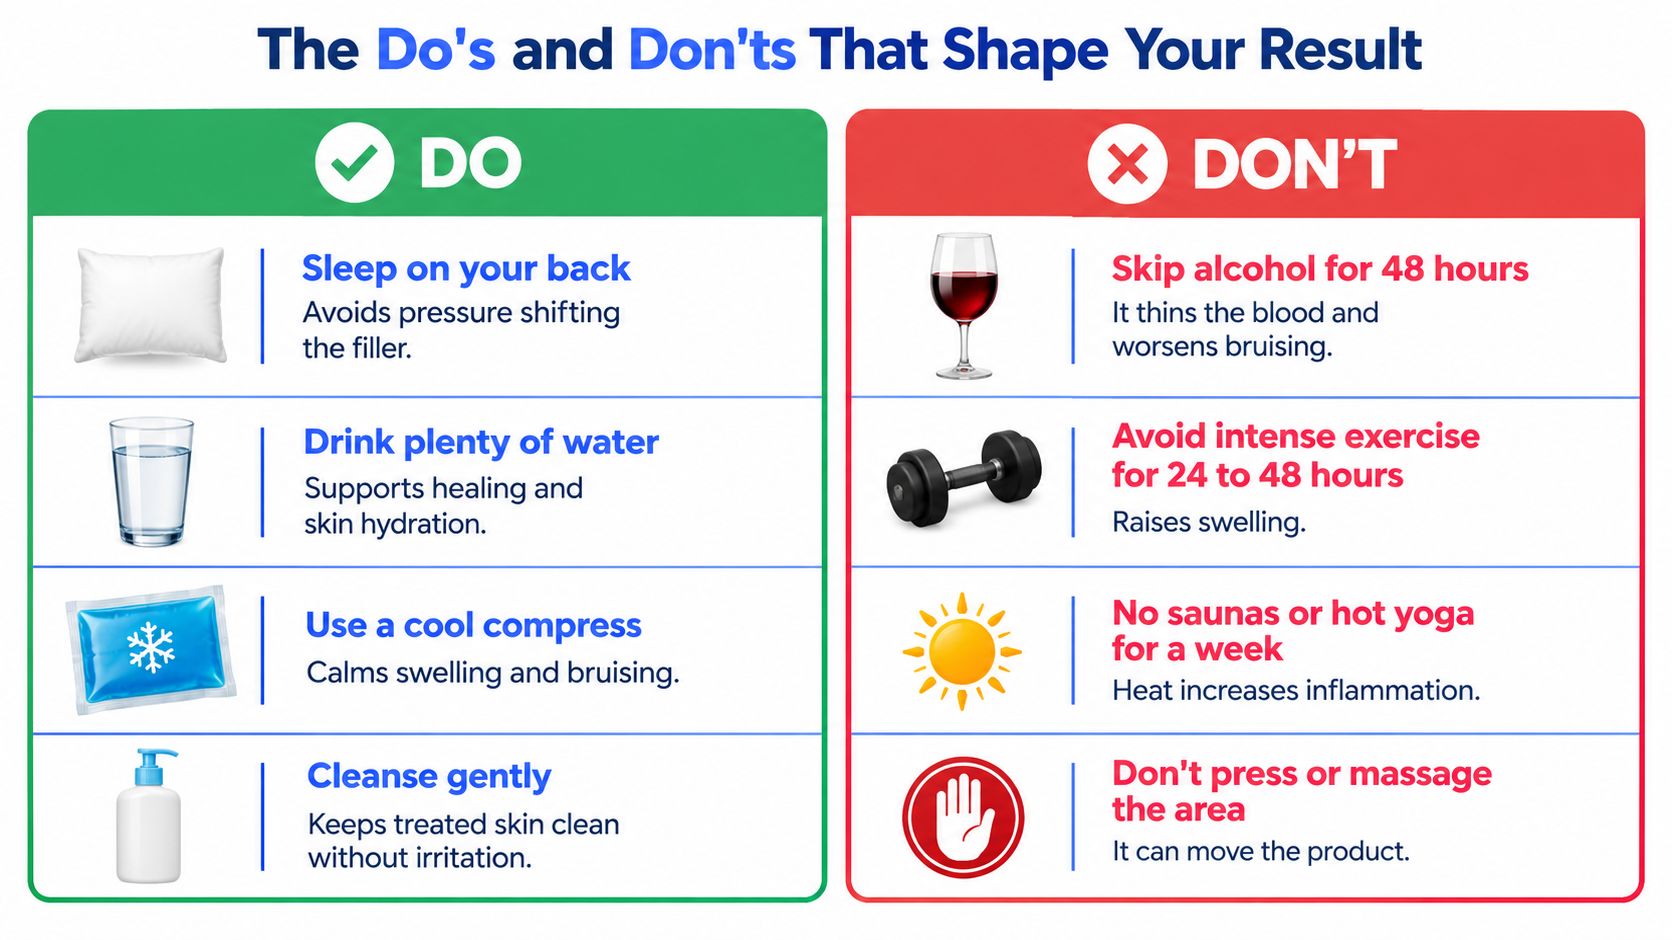
Good dermal fillers aftercare isn't a punishment or a rigid lifestyle reset. It's a short period of reducing pressure, heat, irritation, and activities that can intensify bruising. Some precautions are nearly universal. Others depend on the treatment area, filler type, injection depth, and your own medical history.
Do these consistently
- Sleep on your back when possible. It reduces pressure on the treated area while early swelling is present.
- Drink water regularly. Hydration supports general recovery and makes the first day more comfortable.
- Use a cool compress, not direct ice. Short applications can calm swelling without pressing on the filler.
- Cleanse gently. A mild, fragrance-free cleanser is preferable to scrubbing, brushing, or exfoliating.
- Keep your pillowcase clean. This is a small step, but it limits contact between treated skin and accumulated oils or residue.
- Follow the clinic's specific massage instructions. Some products or treatment plans may require massage, while others should be left alone.
Avoid these early stressors
- Skip alcohol during the early recovery period. Alcohol can worsen bruising for some patients, so waiting 48 hours is a cautious choice.
- Avoid intense exercise for 24 to 48 hours. Increased circulation, body heat, and blood pressure can make swelling and bruising more prominent, as outlined in post-filler activity guidance.
- Postpone saunas and hot yoga. Heat can amplify inflammation, particularly while the area is visibly swollen.
- Don't press or massage the area casually. Repeated touching is more likely to irritate the skin than improve the result.
- Delay facials, microneedling, peels, and similar treatments. Give the injection sites time to close and the tissue time to settle.
- Avoid unnecessary dental manipulation soon after lip or lower-face filler. Ask your injector how long to wait for your specific treatment.
The essential choices are avoiding unapproved massage, intense exercise during the initial restriction window, and heat while swelling is active. The flexible choices include exactly when you return to makeup, light activity, and ordinary skincare. If the skin is closed, calm, and improving, your provider may clear a faster return. If it remains tender or irritated, wait.
Common Side Effects and the Red Flags That Need a Call
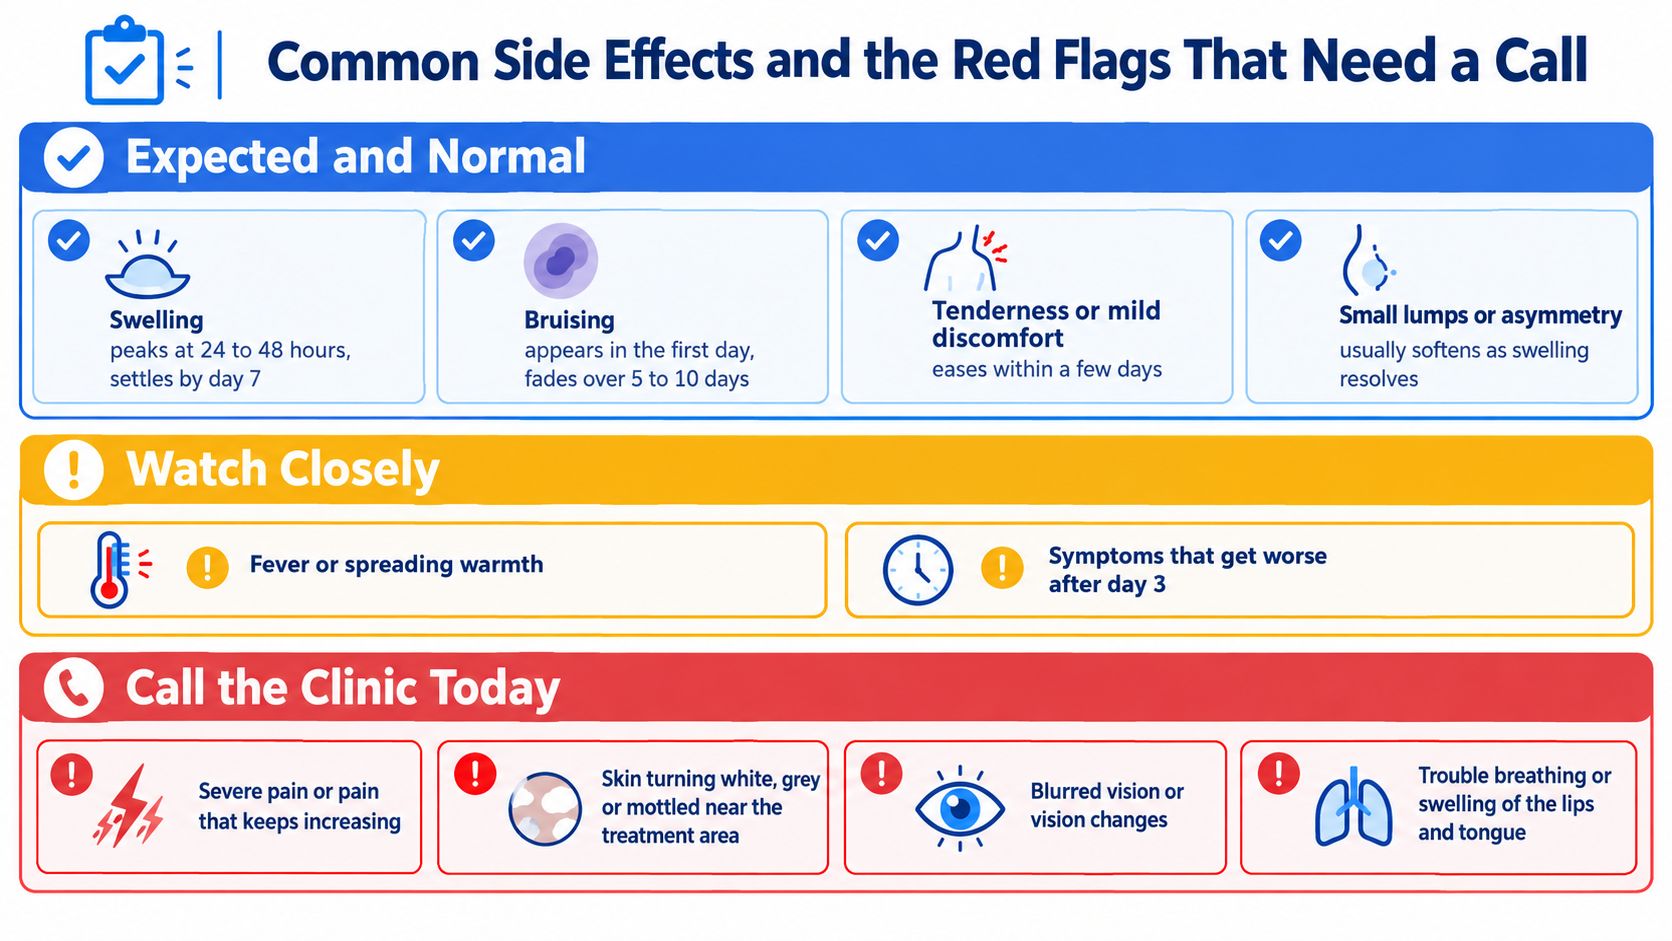
Normal recovery has a pattern. Swelling can peak during the first 24 to 48 hours, bruising may remain visible for several days, and mild tenderness should ease as the tissue calms. Guidance from a professional dermatology organization notes that most swelling, bruising, and redness dissipate within one week to ten days, although individual recovery varies.
Small lumps or mild asymmetry can also occur early. They may reflect swelling around the product rather than a permanent contour problem. Don't squeeze a lump, dig at it, or begin massage because you're anxious. Contact the clinic and let the injector decide whether observation, massage, or an in-person assessment is appropriate.
Symptoms to watch closely
A new fever, spreading warmth, or symptoms that begin or become worse after the early recovery period deserve prompt advice. Independent review data notes that burning, redness, or swelling beginning or persisting two to three days after injection can indicate infection rather than routine inflammation, so don't assume worsening symptoms are merely part of healing. You can review general warning signs in this guide to dermal filler side effects.
Symptoms that need same-day attention
Call the clinic promptly if you notice:
- Severe pain or pain that keeps increasing.
- Skin that turns white, grey, blue, or mottled near the treatment area.
- A hard, tender nodule accompanied by discoloration.
- Spreading redness, increasing warmth, or rapidly worsening swelling.
- Blurred vision, loss of vision, or other sudden visual changes.
Vascular complications are uncommon, with recent literature estimating significant complications at 0.1% to 1%, but severe outcomes can include blindness, stroke, tissue necrosis, and chronic inflammatory reactions, as described in this review of serious filler complications. Visual symptoms or major skin color changes shouldn't wait until the next morning. Seek urgent medical evaluation while contacting the treating clinic.
Before calling, take photographs in natural light without applying makeup or concealer. Include one wider image showing the whole face and closer images showing the change, then note when the symptom began and whether it's spreading. Clear information helps the provider triage you faster.
Weeks 2 to 4, Skincare, and Planning Your Follow-Up
By the second week, many patients are shifting from protecting injection sites to preserving the result. The face may look more balanced, residual firmness may soften, and the initial swelling should no longer dominate your assessment. Don't use a single mirror check to decide whether you need more product.
Support the settled result
Return to skincare gradually. A gentle cleanser, moisturizer, and mineral SPF are sensible foundations once the skin is closed and comfortable. Introduce retinoids, acids, and other strong actives only when irritation has settled, and avoid applying them directly to any area that remains tender or inflamed.
Sun protection matters for the skin's overall appearance, even though sunscreen won't alter the filler itself. Choose a product you'll use consistently, apply it without aggressive rubbing, and keep heat exposure reasonable if the treated area still feels reactive.
Sleep position can be adjusted as comfort returns, but patients treated in pressure-sensitive areas may prefer to remain on their backs longer. Your provider can give more relevant guidance than a generic timeline because cheek, lip, chin, and under-eye treatments don't all behave the same way.
Decide whether you need a review
A follow-up should answer a clinical question, not merely respond to impatience. An assessment around two to three weeks can identify persistent asymmetry, firmness, or an area that needs attention. A fuller evaluation around four weeks gives the provider a better basis for deciding whether volume is genuinely missing.
A touch-up makes sense only when the provider confirms that asymmetry or inadequate volume remains after swelling has resolved. Adding product too early can make temporary swelling look like undercorrection. Bring your baseline photograph, describe how the area changed each day, and mention any discomfort or skincare reaction.
A multi-location practice may also coordinate your check-in with the provider who performed the treatment, request progress photographs, and help you arrange an in-person review if the treating office isn't convenient. That coordination is useful, but it doesn't replace urgent evaluation for vision changes, severe pain, or rapidly changing skin color.
Your Quick Recovery Checklist and Next Steps
Save this checklist before your appointment so you're not searching for answers while your face is swollen.
First hour
- Leave the skin clean. Skip makeup and unnecessary touching.
- Use a wrapped cool compress. Apply it gently for short intervals.
- Save the clinic number. Keep your personalized instructions accessible.
- Take one baseline photograph. Use calm, even lighting and avoid repeated checking.
First day
- Rest with your head raised. Sleep on your back if possible.
- Avoid heat and strenuous exercise. Follow the 24 to 48 hour activity restriction provided for your treatment.
- Choose water and comfortable food. Soft foods may help after lip treatment.
- Don't massage without permission. Leave the area alone unless your injector has instructed otherwise.
- Use approved pain relief only. Ask before taking medicines that may increase bruising.
Days 2 through 7
- Expect some swelling or bruising. The key is that symptoms should begin moving in the right direction.
- Watch tenderness. Mild discomfort should ease, not intensify.
- Protect the skin. Avoid strong actives, scrubbing, facials, and unnecessary pressure.
- Reintroduce activity gradually. Light movement can return when you're improving and your provider agrees.
Call the clinic the same day
- Pain is severe or increasing.
- Redness, warmth, or swelling is spreading.
- Skin becomes white, grey, blue, or mottled.
- A hard tender area develops with discoloration.
- Vision becomes blurred or changes suddenly.
- You have trouble breathing or swelling of the lips or tongue.
A follow-up appointment isn't only a chance to request more filler. The provider assesses the tissue, compares your progress with the original plan, checks whether asymmetry is resolving, and decides whether any touch-up is appropriate. You can also use the visit to refine your skincare routine, discuss future treatment timing, and document what worked well for the next appointment.
The best dermal fillers aftercare plan is specific enough to guide you and flexible enough to respect your treatment area, medical history, and recovery pattern. If something feels wrong, a photograph and a prompt call are more useful than trying to correct the area yourself.
ProMD Health provides dermal filler treatments and provider-led follow-up support across its approved locations, with guidance aligned to your recovery and treatment plan. Visit ProMD Health to explore dermal filler care and arrange the next conversation with a qualified provider.


